This little chill-chaser is just perfect for those cool spring/summer nights! This Filatura Di
Crosa yarn and pattern make this the jacket to have!
SIZES
X–Small (Small, Medium, Large, XL, 2X)
MATERIALS
• 6 (7, 7, 8, 8, 9) balls Filatura Di Crosa TEMPO 51% cotton, 37% acrylic, 12% polyamide (1.75oz/50g; 115yds/105m) in color #05 coral reef
• One pair size 6 (4mm) straight needles
• One pair size 7 (4.5mm) straight needlesOR SIZE TO OBTAIN GAUGE
• 1 button, ¾”/19mm diameter
• Stitch holders
• Stitch markers
• Yarn needle
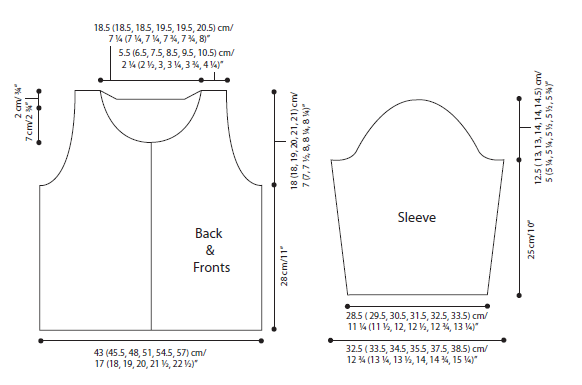
KNITTED MEASUREMENTS
Bust 34 (36, 38, 40, 43, 45)”/86 (91, 96, 102, 109, 114) cm
Length 18 (18, 18½, 19, 19¼, 19¼)”/46 (46, 47, 48, 49, 49) cm
Sleeve Length 9¾ (9¾, 9¾, 9¾, 9¾, 9¾)”/25 (25, 25, 25, 25, 25) cm
GAUGE
20 sts and 26 rows = 4”/10cm in St st and larger needles
TAKE TIME TO CHECK GAUGE
SPECIAL ABBREVIATIONS
K2tog: Knit 2 together (dec) – Knit 2 sts together through the front loops.
PATTERN STITCH
Stockinette stitch (St st) Knit on RS, purl on WS.
BACK
With larger needles, cast on 85 (91, 97, 103, 109, 115) sts.
** Row 1 (RS) K1, * p1, k1; rep from * to end.
Row 2 P1, * k1, p1; rep from * to end.
Row 3 P1, * k1, p1; rep from * to end.
Row 4 K1, * p1, k1; rep from * to end.
Rep these 4 rows once more, then Rows 1 & 2 once. **
Change to St st and work even until piece measures
11”/28cm from beg, end with a WS row.
Shape Armholes
Bind off 4 (4, 5, 5, 6, 6) sts beg next 2 rows.
Dec 1 st each end next 5 rows.
Dec 1 st each end every other row to 59 (63, 67, 73, 77, 83) sts.
Work even until piece measures 17¼ (17¼, 17¾, 18, 18½, 18½)”/ 44 (44, 45, 46, 47, 47)cm from beg, end with a WS row.
Shape Neck
Next Row (RS) K21 (23, 25, 27, 29, 31) sts, turn, on these sts only.
Bind off 5 sts beg next 2 WS rows.
Bind off loosely the rem 11 (13, 15, 17, 19, 21) sts for Shoulder.
Return to rem sts and slip next 17 (17, 17, 19, 19, 21) sts to holder center Back, rejoin yarn, work 2nd half to match, reversing shaping.
LEFT FRONT
With larger needles, cast on 47 (49, 51, 55, 59, 63) sts.
Work as for Back from ** to **.
Next Row (RS) K to last 5 sts, p1, [k1, p1] twice.
Next Row K1, [p1, k1] twice, p to end.
Cont in patt over Front edge 5 sts and St st over rem sts throughout.
When piece measures 11”/28cm from beg, end with a WS row.
Shape Armhole
Keeping Front edge correct, bind off 4 (4, 5, 5, 6, 6) sts beg next RS row.
Dec 1 st at Armhole edge next 5 rows.
Dec 1 st at Armhole edge every RS row 4 (5, 5, 5, 5, 5) times – 34 (35, 36, 40, 43, 47) sts.
Keeping Front edge correct, work even until Front measures 14½ (14½, 15, 15⅜, 15¾, 15¾)”/37 (37, 38, 39, 40, 40)cm from beg, end with a WS row.
Next Row (RS) K to last 5 sts, slip last 5 sts to holder.
Next Row Bind off 10 (10, 10, 10, 11, 11) sts, p to end.
Dec 1 st at Neck edge every row until 11 (13, 15, 17, 19, 21) sts rem.
Work even until Front measures same as Back to Shoulder, end with a WS row.
Bind off loosely rem 11 (13, 15, 17, 19, 21) sts for Shoulder.
RIGHT FRONT
With larger needles, cast on 47 (49, 51, 55, 59, 63) sts.
Work as for Back from ** to **.
Next Row (RS) P1, [k1, p1] twice, k to end.
Next Row P to last 5 sts, k1, [p1, k1] twice.
Cont in patt over Front edge 5 sts and St st over rem sts throughout.
When piece measures 11”/28cm from beg, end with a RS row.
Shape Armhole
Keeping Front edge correct, Bind off 4 (4, 5, 5, 6, 6) sts beg next WS row.
Dec 1 st at Armhole edge next 5 rows.
Dec 1 st at Armhole edge every RS row 4 (5, 5, 5, 5, 5) times – 34 (35, 36, 40, 43, 47) sts.
Keeping Front edge correct, work even until Front measures 14½ (14½, 15, 15⅜, 15¾, 15¾)”/37 (37, 38, 39, 40, 40)cm from beg, end with a WS row.
Next Row (RS) Cont in patt 5 sts and slip these 5 sts to holder, bind off 10 (10, 10, 10, 11, 11) sts, p to end.
Dec 1 st at Neck edge every row until 11 (13, 15, 17, 19, 21) sts rem.
Work even until Front measure same as Back to Shoulder, end with a RS row.
Bind off loosely rem 11 (13, 15, 17, 19, 21) sts for Shoulder.
SLEEVES
With larger needles, cast on 57 (59, 61, 63, 65, 67) sts.
Work as for Back from ** to **.
Cont in St st and inc 1 st each end every 8th (8th, 8th, 8th, 7th, 7th) row to 65 (67, 69, 71, 75, 77) sts.
Work even until Sleeve measures 9¾”/25cm from beg, end with a WS row.
Shape Cap
Bind off 4 (4, 5, 5, 6, 6) sts beg next 2 rows.
Dec 1 st each end next 10 rows.
Dec 1 st each end every other row 6 (7, 7, 8, 8, 9) times.
Dec 1 st each end next 6 rows.
Bind off 3 sts beg next 2 rows.
Bind off loosely rem 7 (7, 7, 7, 9, 9) sts.
FINISHING
Sew Shoulder seams.
Neckband
With RS facing and smaller needles, slip the 5 sts from RIGHT FRONT holder to right-hand needle, rejoin yarn, pick up and k29 (29, 29, 29, 30, 30) sts up Neck edge, 11 sts down Back Neck, k the Back Neck holder 17 (17, 17, 19, 19, 21) sts, pick up and k 11 sts up Back Neck, 29 (29, 29, 29, 30, 30) sts down Front Neck, work in patt the 5 sts from LEFT FRONT holder – 107 (107, 107, 109, 111, 113) sts.
Keeping Front edge correct, work in Front edge patt over all sts for 1 row.
Next Row (RS) Front edge pattern for first 3 sts, k2tog, yo twice, work in patt to end of row.
Cont in patt 1 row but work only into first yo, drop 2nd yo off needle.
Work 4 more rows in patt.
Bind off loosely in patt.
Set in Sleeves. Sew side and Sleeve seams.
Sew on button. Weave in ends.
ABBREVIATIONS
beg begin(ning)
cm centimeter
cont continue(d)(s)(ing)
dec decrease(d)(s)(ing)
inc increase(d)(s)(ing)
k knit
mm millimeters
p purl
patt pattern
rem remain(ed)(s)(ing)
rep repeat(s)(ing)
RS right side
st(s) stitch(es)
tog together
WS wrong side
yo yarn over