Friday, April 29, 2011

Ruffled Round Pillow

Add a little ruffle to your bed pillows. These are soft and oh, so girly! Beginner knitters may need some assistance on some stitches on this one.


KNITTED SIZE
12"/30.5cm diameter (without ruffle)
MATERIALS
Caron International's Simply Soft Eco
(80% acrylic, 20% Post-Consumer
Recycled Polyester, 5oz/142g, 249yds/227m):
Color #0015 Aqua Mist, 8oz/227g
One pair size U.S. 8 (8mm) needles or size to obtain gauge
Two size U.S. 8 (5mm) doublepointed needles (dpns)
Crochet hook size I-9 (5.5mm)
Yarn needle
Pins, sewing needle and thread 12"/30.5cm round pillow form
Two buttons (optional)

GAUGE
In cable stitch using size U.S. 11
(8mm), 14 sts and 16 rows = 4"/10 cm

GAUGE
In Stockinette stitch using size U.S. 8 (5mm) needles, 17 sts and 23 rows
= 4”/10 cm

STITCHES USED
Stockinette stitch (St st)
Reverse Stockinette stitch (Rev St st)
Single crochet (sc)

SPECIAL TERMS
w&t: wrap and turn

PILLOW (Make 1 Front and 1 Back)
CO 26 sts.
First wedge:
Row 1 (WS): P to 4 sts from end, w&t.
Rows 2, 4, 6, 8, 10, 12 (RS): K all sts.
Row 3: P to 4 sts before last turn, w&t.
Row 5: P to 4 sts from last turn, w&t.
Row 7: P to 4 sts from last turn, w&t.
Row 9: P to 4 sts from last turn, w&t.
Row 11: P to 3 sts from last turn, w&t.
Row 13: P3 sts, w&t.
Row 14: K all sts.
Second to Sixteenth Wedges
Repeat First Wedge 15 times more (224 rows total).
Graft sides together to form circle.

RUFFLE
CO 12 sts. Work in Rev St st for 346 rows or long enough to reach around
outer edge of circle. BO.

FINISHING
Close center hole in each round piece by making running stitches around
edge. Gather tightly and secure.
Steam ruffle piece very lightly to flatten.
Using tail end, graft ruffle ends together forming a large loop (knit side or
purl side can be used as RS).

Crochet Edging
Rnd 1: With RS facing and crochet hook, work 1 rnd sc around one side of
ruffle.
Rnd 2: Sc in next sc, *(ch 3, sl st in same sc—picot), sc in next 2 sc;
repeat from * around, end with slip stitch in first sc. Fasten off.
Weave in ends on all pieces. Block round pieces.

Pillow assembly
Gather unfinished side of ruffle with small running stitches to fit circle. Pin
and baste to pillow front. Sew together by hand or sewing machine. Put
remaining piece on top, with RSs together and sew leaving a 5" opening.
Insert pillow form in opening and sew opening closed.

I-Cord
With dpn, CO 3 sts.
K3, do not turn. Slide sts back to beg of needle to work next row from RS,
pulling yarn tightly across WS. Repeat from * until I-cord is long enough to
reach around pillow.
Last row: Sl 1, k2tog, psso. Fasten off.
Sew I-cord in place around pillow (see photo).
Optional: Add buttons to centers.

Wednesday, April 27, 2011

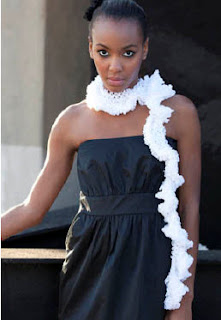
White Airy Scarf

This airy scarf will take the chill out of a cool summer night.


Size- Approx. 4” W x 97”L

Materials-
1 skein of Festival by Feza Yarns (280 yds; 50g)
US # 11 needles OR SIZE NEEDED TO OBTAIN GAUGE
US G crochet hook
tapestry needle
scissors
tape measure

Gauge- 3.5 sts & 6 rows = 1” in Stockinette st with US 11 needles, OR SIZE NEEDED TO OBTAIN GAUGE.


SCARF BODY
Using US # 11 needles, OR SIZE NEEDED TO OBTAIN GAUGE, CO 16 sts.
Row 1-6: Knit.
Row 7: *K1, (yo) four times, repeat from * to end of row.
Row 8- *K1, drop all yarn overs from the previous row, repeat from * to end of row. Pull to draw out elongated stitches.
Repeat Rows 3-8 until piece measures approx. 96” from CO edge., ending on Row 8. Work in Garter st for five rows, binding off all sts on the third row.
Note from the Designer: Count the number of times Rows 3-8 are repeated. This will help you know how many lengths of yarn to cut for the finishing steps.


FINISHING
Weave in all loose ends.
Body Fringe-
Using tape measure and scissors cut 4 lengths of yarn 12” long, for each repetition of Rows 3-8.
*Insert the US G crochet hook under the first four elongated stitches pulled free in the first repetition of Row 8; take two strands of the 12” long yarn, fold them in half over the hook and draw through a loop. Pass the loose ends over the hook and draw through the loop on the hook. Tighten the knot so that it is placed at roughly the middle point of the elongated stitches. Repeat this process with the last four elongated stitches on this same row.
Moving up to the next set of elongated stitches, insert the US G crochet hook under the 5th through 8th stitches; take two strands of the 12” long yarn, fold them in half over the hook and draw through a loop. Pass the loose ends over the hook and draw through the loop on the hook. Tighten the knot so that it is placed at roughly the middle point of the elongated stitches. Repeat this process with the 9th through 12th stitches elongated stitches on this same row.
Repeat from * until every elongated stitch row has strands of yarn tied to two sets of four elongated stitches.


Edge Fringe-
Using tape measure and scissors cut the remaining yarn in the skein into 25” lengths of yarn.
Insert the US G crochet into the corner of the CO edge; take three strands of the 25” long yarn, fold them in half over the hook and draw through a loop. Pass the loose ends over the hook and draw through the loop on the hook. Tighten the knot. Repeat this process, placing another fringe knot every 1” along the CO edge, ending at the other corner. (Four fringe knots of three 25” long strands placed). Repeat this process along the BO edge.
*Insert the US G crochet into the first stitch of the first row above the first elongated stitch row above the CO edge; take one strand of the 25” long yarn, fold them in half over the hook and draw through a loop. Pass the loose ends over the hook and draw through the loop on the hook. Tighten the knot. Repeat this process on the final stitch of this same row.
Repeat from * twice more, each time moving to the row the next set of elongated stitches.
Repeat from * on the opposite (BO) end.

Saturday, April 23, 2011

Spring Beanie

Have fun knitting this lace beanie. Wear it with your new Boho look!


MATERIALS
Naturally Caron.com Country
75% Microdenier acrylic, 25% Merino wool; 3
oz/100 g, 185 yds/170 m ball): 3 oz
Shown in: #0021 Peacock, 3oz/85g
One circular size U.S. 5 (3.75 mm) needle, 16”/40.5cm long, or size to obtain gauge
One circular size U.S. 4 (3.5mm) needle, 16"/40.5cm long
One set of double pointed needles (dpn) size U.S. 5 (3.75 mm)
Stitch marker
Yarn needle
Row counter (optional)


FINISHED MEASUREMENTS
Hat measures approximately 15”/38cm circumference (unstretched)
GAUGE
In Basic Pattern using larger needles, 10 sts and 15 rows = 4"/10 cm


SPECIAL TERMS
k2tog (dec): Knit 2 sts together through the front loops.
M1: Make 1 (inc): Lift strand between needles to LH needle and work strand through the back loop, twisting it to prevent a hole
Chain Loop: Knit next st but do not drop st from LH needle, [yo on RH needle, pass st over] 5 times, knit through back in next LH needle st, pass RH needle st over.
NOTE
Place a marker (pm) at beginning of round, and move up each round.


HAT
Brim
Using smaller needle, CO 72 sts loosely.
Join, being careful not to twist sts; pm for beginning of rnd.
Rnds 1-6: [K1, p2, k1] 18 times.


Body
Change to larger needle.
Rnd 1: [K1, yo, k1, k2tog] 18 times.
Rnd 2: [K3, work chain loop] 18 times.
Rnd 3: K.
Rnds 3-36: Rep Rnds 1–3, 11 times more.


Shape Crown
Note: Change to dpns as needed.
Rnd 1: [*K1, yo, k1, k2tog; rep from * once more; k2, k2tog] 6 times--66 sts.
Rnd 2: [*K3, work chain loop; rep from * once more; k2, work chain loop] 6 times.
Rnd 3: [K9, k2tog] 6 times--60 sts.
Rnd 4: [*K1, yo, k1, k2tog; rep from * once more; k2] 6 times.
Rnd 5: [*K3, work chain loop; rep from * once more; k1, work chain loop] 6 times.
Rnd 6: [K8, k2tog] 6 times--54 sts.
Rnd 7: [K1, yo, k1, k2tog, k1, yo, k1, k3tog] 6 times--48 sts.
Rnd 8: [*K3, work chain loop] 12 times.
Rnd 9: [K6, k2tog] 6 times--42 sts.
Rnd 10: [K1, yo, k1, k2tog, k1, k2tog] 6 times--36 sts.
Rnd 11: [*K3, work chain loop, k2tog] 6 times--30 sts.
Rnd 12: [K3, k2tog] 6 times--24 sts.
Rnd 13: K.
Cut yarn, leaving an 18" tail.


FINISHING
Thread yarn needle with tail, run tail through remaining sts; pull to gather top and fasten off securely.
Using yarn needle, weave in ends.

Thursday, April 21, 2011

Felted Afghan

Baby, it's cold inside...especially when you have that AC blasting! You may need a little afghan to keep you comfy watching your favorite TV Show!


MATERIALS
• 820-201 Lion Brand Lion Wool: Autumn Sunset (print color)
3 Balls (A)
• 820-140 Lion Brand Lion Wool: Rose
4 Balls (B)
• Knitting Needles - Size 10 [6 mm]
• Large-Eye Blunt Needles

GAUGE:
16 sts + 24 rows = 4 in. [10 cm] in St st (k on RS, p on WS) before felting. BE SURE TO CHECK YOUR GAUGE.

STITCH EXPLANATION:
Afghan is knit in St st. After knitting, stitches are dropped to create decorative strands and the afghan is felted.

AFGHAN STRIP
With A, cast on 27 sts.
Set-up Row: *K 3, bind off 3; rep from * to last 3 sts, k 3.
Next Row: *P 3, cast on 3; rep from * to last 3 sts, p 3.
Work in St st (k on RS, p on WS) until one ball of A is nearly used up.
Drop-Stitch Row: *K 3, drop 3 sts from left needle, cast 3 sts onto right needle; rep from * to last 3 sts, k 3.
Bind off.
Make 2 more strips using A.
Make 4 strips with B, working to same length as A strips.

FINISHING
Pull dropped stitches open all the way back to cast-on edge. Alternating A and B strips, sew strips together. Weave in ends.

FELTING
Wash in top-loading machine on a hot wash/cold rinse cycle with detergent and several pieces of clothing to agitate.
Remove Afghan from washer after water has drained, but before spin cycle begins. Lay Afghan on a flat surface and pin into shape. Allow to dry.

Monday, April 18, 2011

Lace Cowl in Merino Cashmere

Perfect for that cool summer night, as well as keeping you warm next winter. SIZE: One Size About 26 in. (66 cm) circumference

MATERIALS • 821-150 Lion Brand Superwash Merino Cashmere Yarn: Slate 4 Balls • Split Ring Stitch Markers • Large-Eye Blunt Needles • Additional Materials Circular knitting needle size 8 (5 mm), 16 in. (40.5 cm) long

GAUGE: 17 sts = 4 in. (10 cm) over Lace Pattern. BE SURE TO CHECK YOUR GAUGE. When you match the gauge in a pattern, your project will be the size specified in the pattern and the materials specified in the pattern will be sufficient. If it takes you less stitches and rows to make a 4 in. [10 cm] square, try using a smaller size hook or needles; if more stitches and rows, try a larger size hook or needles.

STITCH EXPLANATION: ssk (slip, slip, knit) Slip next 2 sts as if to knit, one at a time, to right needle; insert left needle into fronts of these 2 sts and knit them tog. sk2p Slip 1 as if to knit, knit 2 together, pass slipped stitch over - 2 sts decreased. yo A yarn over (yo) creates a new loop on your needle and is worked by wrapping the yarn around your right hand needle. Do not use an existing stitch to make a yarn over. The finished yarn over will leave an open space (like an eyelet) in your knitting - that is part of this design.

PATTERN STITCH Note: If desired, place a st marker between each rep of the Lace Pattern. Lace Pattern Rnds 1 and 3: Knit. Rnd 2: K1, *(yo, ssk) twice, k1, (k2tog, yo) twice, k1; rep from * around. Rnd 4: K2, *yo, ssk, yo, sk2p, yo, k2tog, yo, k3; rep from * around to last 9 sts, yo, ssk, yo, sk2p, yo, k2tog, yo, k2. Rep Rnds 1-4 for Lace Pattern.

COWL Cast on 131 sts. Place marker for beg of rnd. Join by working the first st on left hand needle with the working yarn from the right hand needle and being careful not to twist sts. Beg with Rnd 1, work in Lace Pattern until piece measures about 14 in. (23 cm) from beg, ending with a Rnd 1. Bind off.

FINISHING Weave in ends.

Saturday, April 16, 2011

Vintage Vest

This vest will look great with a long ruffle shirt and skinny jeans.


SIZES Directions are for women’s size X-Small. Changes for sizes Small, Medium, Large, 1X and 2X are in parentheses


FINISHED MEASUREMENTS Bust (closed) – 32(36-40-44-48-52)” Length – 17½(18-19-19½-20½-20½)” MATERIALS 2(2-3-3-3-3) Balls BERROCO VINTAGE DK (100 grs), #2184 Sloe Berry (MC) and 1 ball #2105 Oats (CC) Straight knitting needles, size 5 (3.75 mm) OR SIZE TO OBTAIN GAUGE Two 1” buttons Optional: 1 metal snap

GAUGE 23 sts = 4”; 32 rows = 4” in St st TO SAVE TIME, TAKE TIME TO CHECK GAUGE


BACK With straight needles, using MC, cast on 80(92-104-114-126-138) sts. Work even in St st for 1(1-1½-1½-2- 2)”, end on WS. Inc Row (RS): K1, M1k, k to last st, M1k, k1 – 82(94-106-116-128-140) sts. Rep this inc every 1” 5 times more – 92(104-116-126-138-150) sts. Work even until piece measures 8(8-8½-8½-9-9)” from beg, end on WS. Shape Armholes: Bind off 5(5-6-7-9-10) sts at beg of the next 2 rows, then 2 sts at beg of the following 2 rows – 78(90-100-108-116-126) sts. Dec Row (RS): K1, SSK, k to last 3 sts, k2 tog, k1 – 76(88-98-106-114-124) sts. Rep this dec every RS row 3(9-12-13-14-16) times more – 70(70-74-80-86-92) sts. Work even until armholes measure 8½(9-9½- 10-10½-10½)”, end on WS. Shape Shoulders: Bind off 5(5-5-5-7-8) sts at beg of the next 4(4-8-2-4-2) rows, then 4(4-0-6-6-7) sts at beg of the next 4(4-0-6-4-6) rows. Bind off remaining 34 sts for back neck.

LEFT FRONT With straight needles, using MC, cast on 40(46-52-57-63-69) sts. Row 1 (RS): K to last st, pick up horizontal strand between the st just worked and next st and place this strand on RH needle, sl the last st. Row 2: P slipped st and picked-up strand tog TBL, p to end. Work even in pat as established until piece measures ½” from beg, end on WS. Buttonhole Row (RS): K to last 12 sts, bind off 2 sts, k to last 5 sts, bind off 2 sts, work to end. Next Row: Work in pat as established, cast on 2 sts over each pair of sts bound off on previous row. Work even until piece measures 1(1-1½-1½-2-2)” from beg, end on WS. Shape Side and Neck: Next Row (RS): K1, M1k (side inc), k to last 3 sts, k2 tog (neck dec), work last 2 sts in pat as established. Working incs and decs in this manner, continue to inc at side edge every ¾” 5 times more. AT THE SAME TIME, continue to dec at neck edge every 1” 16 times more. When side incs have been completed and piece measures 8(8-8½-8½- 9-9)” from beg, end on WS. Continuing to work neck decs, shape armhole same as back, working decs as k1, SSK. When all armhole and neck decs have been completed, work even on 18(18-20-23-26-29) sts until armhole measures 8½(9-9½-10-10½-10½)”, end on WS. Bind off 5(5-5-5-7-8) sts at armhole edge 2(2-4-1-2-1) times, then 4(4-0-6-6-7) sts 2(2-0-3-2-3) times for shoulder.

RIGHT FRONT With straight needles, using MC, cast on 40(46-52-57-63-69) sts. Knit 1 row, end on RS. Row 1 (WS): P to last st, pick up horizontal strand between last st worked and next st and place this strand on RH needle, sl 1. Row 2 (RS): K2 tog TBL, k to end. Working in pat as established, complete to correspond to left front, reversing all shaping and omitting buttonholes. Work neck decs at beg of RS rows as work 2 sts in pat as established, SSK. Work side incs at end of RS rows as M1k, k1. Bind off for armhole on WS rows. Work armhole decs at end of RS rows as k2 tog, k1. Bind off for shoulder on WS rows.

FINISHING Sew shoulder and side seams. Edging: With RS facing, using crochet hook and CC, join yarn at left shoulder seam with a sl st. * Sc on edge of vest, skip ¼" on vest, work 5 dc’s in same spot on edge of vest (shell made), rep from * along left front, lower, right front, then back edges of vest, skip ¼" on edge of vest, join with a sl st in first sc. Fasten off. Lap left front over right front and sew on buttons.

Thursday, April 14, 2011

Be Daring...Try an Entrelac Pattern

If you would like to try something a little challenging as a new knitter, or if you are experienced, this scarf will show off your talents quite nicely!


SIZE: One Size About 8 x 71 1/2 in. (20.5 X 181.5 cm) MATERIALS • 825-206 Lion Brand AmazingTM Yarn: Arcadia 4 Balls • Split Ring Stitch Markers • Large-Eye Blunt Needles- • Additional Materials Circular knitting needle size 9 (5.5 mm), 36 in. (91.5 cm) long GAUGE: 16 sts + 22 rows = 4 in. (10 cm). BE SURE TO CHECK YOUR GAUGE. When you match the gauge in a pattern, your project will be the size specified in the pattern and the materials specified in the pattern will be sufficient. If it takes you less stitches and rows to make a 4 in. [10 cm] square, try using a smaller size hook or needles; if more stitches and rows, try a larger size hook or needles.


STITCH EXPLANATION: -M1 (make 1) An increase worked by lifting the horizontal thread lying between needles and placing it onto left needle. Knit this new stitch through the back loop - 1 st increased. -ssk (slip, slip, knit) Slip next 2 sts as if to knit, one at a time, to right needle; insert left needle into fronts of these 2 sts and knit them tog - 1 st decreased. -sk2p (slip-knit 2 together-pass slipped st over) A double decrease worked as follows: 1. Insert right needle as if to knit, and slip the next st from the left needle to the right needle. 2. Knit the next 2 sts together. 3. With tip of left needle, lift the slipped st (the 2nd st on right needle) up and over the k2tog (first st on right needle) and off the needle - 2 sts decreased.


NOTES: 1. Entrelac knitting consists of rows of triangles and squares that are worked in short rows. Short rows are rows that are worked over a portion of the sts in a row, leaving the remaining sts unworked. To work short rows, the pattern instructions will tell you to 'turn' before you reach the end of the row. 2. Follow the instructions for each row carefully and be sure to keep track of your place in the pattern. 3. Stitch markers are used to make it easier to see the beg and end of each short row triangle or square. Move the position of the markers following the pattern instructions, being careful to move the beg of the row marker or the end of row marker as specified in the pattern. Use different color markers to make it easier to distinguish the beg of the row marker from the end of the row marker. 4. The Scarf begins with a section of foundation triangles, then half triangles and squares are worked. To finish the Scarf, a section of finishing triangles is worked. 5. Unless otherwise noted, slip all sl sts as if to purl.


SCARF Cast on 24 sts. Foundation Triangle Section First Foundation Triangle Row 1 (RS): K1, turn. Row 2 and all WS rows: P to end of row. Row 3: Sl 1, k1, place marker (pm), turn. Row 5: Sl 1, k1 (to marker), remove marker, k1, pm, turn. Row 7: Sl 1, k2 (to marker), remove marker, k1, pm, turn. Row 9: Sl 1, k3, (to marker), remove marker, k1, pm, turn. Row 11: Sl 1, k4 (to marker), remove marker, k1, pm (for beg of next triangle), DO NOT TURN. Foundation Triangles 2-4 Row 1 (RS): K1, turn. Row 2 and all WS rows: P all sts of this triangle (to beg marker), turn. Remove beg marker at end of Row 10. Row 3: Sl 1, k1, pm, turn. Row 5: Sl 1, k1 (to marker), remove marker, k1, pm, turn. Row 7: Sl 1, k2 (to marker), remove marker, k1, pm, turn. Row 9: Sl 1, k3 (to marker), remove marker, k1, pm, turn. Row 11: Sl 1, k4 (to marker), remove marker, k1, pm (for beg of next triangle), DO NOT TURN. Rep Rows 1-11 two more times - you will have made a total of 4 base triangles. Do not place a marker at the end of the last rep of Row 11, TURN. Left-Edge Half Triangle Note: The foundation row is completed by working a left-edge half triangle. Row 1 (WS): K1, turn. Row 2: Kfb. Row 3: K1, p2tog, turn. Row 4: K1, M1, k1. Row 5: K1, p1, pm, p2tog, turn. Row 6 and all RS rows: K to last st, M1, k1. Row 7: K1, p2 (to marker), p2tog, turn. Row 9: K1, p3 (to marker), p2tog, turn. Row 11: K1, p4 (to marker), remove marker, p2tog, pm (for beg of next square), DO NOT TURN. Wrong Side Squares Row 1 (WS): Pick up and purl 6 sts along edge of next foundation triangle; sl last st back to left hand needle, pm, and p2tog, turn. Row 2: Sl 1, k5 (to beg marker), turn. Row 3: Sl 1, p4 (to marker), p2tog, turn. Row 4 and all RS rows: K6 (to beg marker), turn. Remove beg marker at end of Row 10. Rows 5 and all WS rows: Sl 1, p4 (to marker), p2tog, turn. Row 11: Sl 1, p4, remove marker, p2tog, DO NOT TURN. Rep Rows 1-11 two more times. Place a marker at the end of the last rep of Row 11 (for beg of right-edge half triangle). Right-Edge Half Triangle Row 1: Pick up and purl 6 sts along edge of last foundation triangle, turn. Row 2 and all RS rows: K all sts of this triangle (to beg marker), turn. Remove beg marker at end of Row 10. Row 3 and all WS rows: Sl 1, p to last 2 sts, p2tog, turn. Row 11: P2tog, turn. The last st of this triangle is the first st of the first right-side square. First Right Side Square Row 1: Sl last st of right-edge half triangle, pick up and knit 5 more sts (for a total of 6 sts) along upper edge of right-edge half triangle; sl last st back to left-hand needle, pm; ssk, turn. Row 2: Sl 1, p to end of row, turn. Rows 3 and all RS rows: Sl 1, k4 (to marker), ssk, turn. Rows 4 and all WS rows: P to end of row, turn. Row 11: Sl 1, k4, remove marker, ssk, pm (for beg of next square), DO NOT TURN. Next Right Side Squares Row 1: Pick up and knit 6 sts along upper edge of next square; sl last st back to left-hand needle, pm, and ssk, turn. Row 2: Sl 1, p all sts of this square (to beg marker), turn. Row 3 and all RS rows: Sl 1, k4 (to marker), ssk, turn. Row 4 and all WS rows: P all sts of this square (to beg marker), turn. Remove beg marker at end of Row 10. Row 11: Sl 1, k4, remove marker, ssk, pm (for beg of next square), DO NOT TURN. Rep Rows 1-11 three more times. Do not place marker at end of last Row 11, TURN. Rep from left-edge half triangle, working the left-edge half triangle and the wrong side squares across edges of squares (instead of base triangles), until Scarf measures approximately 70 in. (178 cm) from beg, end with a row of wrong side squares and a right-edge half triangle. First Finishing Triangle The last st of the right-edge half triangle is the first st of the first finishing triangle. Row 1 (RS): Sl last st of right-edge half triangle, pick up and knit 5 more sts (for a total of 6 sts) along upper edge of right-edge half triangle; sl last st to left-hand needle, pm; ssk, turn. Row 2 and all WS rows: P to end of row. Row 3: K2tog, k3 (to marker), ssk, turn. Row 5: K2tog, k2 (to marker), ssk, turn. Row 7: K2tog, k1 (to marker), ssk, turn. Row 9: K2tog, remove marker, ssk, turn. Row 11: Sk2p, DO NOT TURN. The last st of this triangle is the first st of the next finishing triangle. Next Finishing Triangles Row 1: Pick up and knit 5 more sts (for a total of 6 sts for this triangle) along upper edge of next square; sl last st back to left-hand needle, pm, and ssk, turn. Row 2 and all WS rows: P to end of row. Row 3: K2tog, k3 (to marker), ssk, turn. Row 5: K2tog, k2 (to marker), ssk, turn. Row 7: K2tog, k1 (to marker), ssk, turn. Row 9: K2tog, remove marker, ssk, turn. Row 11: SK2p, DO NOT TURN. The last st of this triangle is the first st of the next finishing triangle. Rep Rows 1-11 two more times. Fasten off. Edging Long Sides From RS, pick up and knit 330 sts evenly spaced along one side edge of Scarf. Row 1: *K1, p1; rep from * across. Row 2: *P1, k1; rep from * across. Bind off. Work edging in same way along the other side edge of Scarf. Ends From RS, pick up and knit 36 sts evenly spaced across one short end of Scarf. Work edging as for long side. Work edging in same way along opposite end of Scarf. Weave in ends.

Tuesday, April 12, 2011

Summery Potato Chip Scarf

Bring out your summer diva, knit this up and wear with your favorite maxi dress and sandals! SIZE One size KNITTED MEASUREMENTS Length of Cast-On Edge 68”/173 cm Spiraled Scarf 72”/183 cm x 3”/7.5 cm MATERIALS • 2 balls Filatura Di Crosa LOVELY JEANS 100% cotton (1.75oz/50g; 93yds/85m) in color #59 snow white (A) • 1 hank Filatura Di Crosa BANDEL 75% cotton, 25% nylon (1.75oz/50g; 77yds/70m) in color #07 opal (B) • One pair size 9 (5.5mm) needles OR SIZE TO OBTAIN GAUGE • Yarn needle GAUGE 14 sts = 4”/10 cm in Stockinette stitch and A GAUGE IS NOT ESSENTIAL FOR THIS PROJECT, but should be loose SPECIAL TERM K1-f/b: Knit 1 front and back (inc) - Knit into front loop of next st, then knit it again through the back loop. NOTES: Scarf is knit lengthwise. Always hold B to RS of work and work 1 st in every square eyelet along edge of Bandel ribbon yarn. SCARF With A, cast on 125 sts. Join B. Row 1 (RS) With 1 strand each of A and B, knit. Row 2 (Inc Row) K1-f/b in each st across – 250 sts. Drop B. Rows 3 and 4 With A only, knit. Pick up B. Rows 5 and 6 With 1 strand each of A and B, knit. Drop B. Row 7 (Inc Row) With A only, k1-f/b in each st across – 500 sts. Row 8 Knit. Row 9 Purl. Row 10 Knit. Pick up B. Row 11 With 1 strand each of A and B, knit. Bind off all sts knitwise using both A and B. Weave in ends. WORKING WITH BANDEL BANDEL is a soft cotton-blend ribbon yarn with one smooth edge and square eyelets forming a “railroad track” along the opposite edge. While it can be knitted or crocheted alone, it is more frequently used as a carry-along yarn to create dramatic ruffles on a garment or accessories created from a classic yarn. To add a ruffle, simply pick up BANDEL [with the tip of the needle inserted into a square eyelet] and knit it together with the main yarn. The pick-up should be made in each stitch in that row, inserting the needle into EVERY square eyelet on BANDEL (or as indicated in the pattern).

Sunday, April 10, 2011

One Cute Tote...Three Sizes

Knit up the tote to fit your needs...or knit up all three for your many moods! SIZES Directions are for size Small. Changes for sizes Medium and Large are in parentheses. FINISHED SIZES Small - Approximately 12 1/2” wide x 8 1/2” high after felting (Not including handles). Medium – Approximately 17” wide x 12 1/2” high after felting (Not including handles). Large – Approximately 21” wide x 13 1/2” high after felting (Not including handles). Note: This bag is much larger than the given measurements before finishing. It will shrink down during the felting process. MATERIALS For Small - BERROCO VIBE (50 grs), 4 balls #4503 Unforgettable. For Medium – BERROCO VIBE (50 grs), 6 balls #4502 Miss Otis Regrets. For Large – BERROCO VIBE (50 grs), 8 balls #4511 Doo Wop. 29” Length circular knitting needle, size 17 OR SIZE TO OBTAIN GAUGE. Straight knitting needles, size 17. 1 St marker. GAUGE 10 sts = 4”; 13 rows = 4” in St st on size 17 needle. TO SAVE TIME, TAKE TIME TO CHECK GAUGE. NOTE Bag is made in one piece in the round. Handles are knit separately and sewn on before felting. HANDLES (Make 2) Note: Both handles may be knit at the same time using separate balls of yarn. With straight needles, cast on 10 sts. Work even in St st until piece measures 25” from beg, end on WS. Bind off all sts. BAG With circular needle, cast on 76(96-116) sts. Join, being careful not to twist sts. Mark for beg of rnd and carry marker up. Work even in St st (k EVERY rnd) until piece measures 15(20-24)” from beg or until yarn is almost gone. Bind off all sts. FINISHING Lay bag flat and sew bottom seam. Sew cast-on edge of one handle to front of bag 4” in from left edge. Sew bound-off edge of same handle to front of bag 4” in from right edge. Sew the other handle to back of bag in the same manner. Felting: Wash for 20 minutes in washing machine set on heavy duty cycle using hot water and soap. Rinse well with cold water. Remove from washer and lay flat, then allow to dry. If bag has not felted enough, repeat the process. Bag may be steamed after felting for a more finished look if necessary.

Wednesday, April 6, 2011

Waffle Scarf

Fast...Fun...Easy! Knit this scarf up in no time flat!

Materials: 1 Tilli Tomas Mega Hank

1 pair size 15 US Needles

Size: Approx 88" x 6"


Cast on 146 sts leaving a 6 inch tail. Start and end each row with a 6 inch tail.

Row 1: Knit

Row 2: *k1, yo, K2tog* repeat *to end

Row 3 and 4: Knit

Repeat rows 2,3,4 ending with row 3.

Bind off.

Monday, April 4, 2011

AHHH..Organic Cotton Back Scrubber

Make one for yourself, then take a day off and spa, or add into a Mother's Day Spa Basket! SIZE: One Size About 8 x 22 in. (20 x 56 cm) MATERIALS • 480-098 Lion Brand Nature's Choice Organic Cotton Yarn : Almond 2 Balls • Knitting Needles- Size 8 [5 mm] • Crochet Hook - Size K-10.5 • Large-Eye Blunt Needle GAUGE: Exact gauge is not important to this project STITCH EXPLANATION: PATTERN STITCH K1, p1 Rib Row 1: *K1, p1; rep from across. Row 2: K the knit sts and p the purl sts. Rep Row 2 for K1, p1 Rib. SCRUBBER Cast on 40 sts. Work in K1, p1 Rib for 3 in. (7.5 cm). Next Row: Bind off 10 sts, k to end of row - 30 sts at end of row. Next Row: Bind off 10 sts, k to end of row - 20 sts. Work in Garter st (k every row) until piece measures about 15 in. (38 cm) from beg. Next Row: K10, cast on 10 sts - 30 sts. Rep last row once - 40 sts. Work in K1, p1 Rib for 3 in. (7.5 cm). Bind off. FINISHING Beginning at cast-on end of piece, sew ends of rib together. Fold cast-on edge of rib to meet last row of rib, sew edges together. Rep for rib at bound-off end of Scrubber. Edging With RS facing, join yarn with slip st along one side of Garter st section. Ch 1, work single crochet evenly spaced along side, making sure to have an even number of sts. Next Row: Ch 1, turn, work 3 double crochet in next st, single crochet in next st; rep from * across. Fasten off. Work edging along opposite side in same way. Weave in ends.

Saturday, April 2, 2011

Knitted Oversized T

A caftan style T-shirt...easy and breezy for spring and summer!


SIZES Directions are for women’s size X-Small. Changes for sizes Small, Medium, Large, 1X and 2X are in parentheses

FINISHED MEASUREMENTS Bust – 60(64-68-72-76-80)” Length – 24(24-25-25½-26½-27)”


Note: This garment was designed to be very oversized and drapey. Please take this into consideration when selecting your size. If you do not want as much fullness as shown in photo, make a smaller size.


MATERIALS 7(8-9-10-11-11) Balls BERROCO LINSEY (50 grs), #6502 Edgartown (MC) and 1 ball #6508 Chilmark (CC) 29” Length circular knitting needle, size 8 (5.00 mm) OR SIZE TO OBTAIN GAUGE 1 St marker GAUGE 16 sts = 4”; 22 rows = 4” in St st TO SAVE TIME, TAKE TIME TO CHECK GAUGE NOTE This garment is made in one piece, worked from side to side( right edge to left edge).


Start with MC and work until that first ball is gone (always tie on a new ball at beg or end of a row). Change to CC and work until that ball is gone, then change back to MC and work to end.

The width of the CC stripe will vary from one size to the next.


CAFTAN

With circular needle, using MC, cast on 192(192-200-204-212-216) sts using long-tail method.

Row 1 (WS): P96(96-100-102-106-108), place marker, p to end. Pattern Stitch: Row 1 (RS): Sl 1 knitwise WYIB, (k1, p1) twice, k to last 5 sts, (p1, k1) twice, end k1.

Row 2: Sl 1 purlwise WYIF, (k1, p1) twice, p to last 5 sts, (p1, k1) twice, end p1. Work even in pat as established (changing colors as in note) until piece measures 11(12-13-14-15-16)” from beg, end on WS.


Divide for Neck: Next Row (RS): Work to marker, sl remaining sts to a piece of scrap yarn for back – 96(96-100-102-106-108) sts. Turn.


Note: From here, continue to work in pat as established over 5 sts at beg of RS rows and at end of WS rows. Work remaining sts in St st.


Front:

Shape Neck:

Row 1 (WS): Bind off 8 sts, work to end – 88(88-92-94-98-100) sts. Row 2: Work even.

Row 3: Rep Row 1 – 80(80-84-86-90-92) sts. Dec Row (RS): Work to last 4 sts , k2 tog, k2 – 79(79-83-85-89-91) sts.

Next Row: Work even. Rep the last 2 rows 7 times more – 72(72-76-78-82-84) sts. Work even for 2”, end on WS. I

nc Row (RS): Work to last 2 sts, M1k, k2 – 73(73-77-79-83-85) sts. Next Row: Work even. Rep the last 2 rows 6 times more, then rep Inc Row once more, end on RS – 80(80- 84-86-90-92) sts. Cast on 8 sts at beg of the next 2 WS rows, end on WS – 96(96-100-102-106-108) sts. Sl these sts to a piece of scrap yarn.


Back: With RS facing, sl 96(96-100-102-106-108) sts from first piece of scrap yarn to circular needle. Join MC.

Note: From here, continue to work 5 sts at end of RS rows and at beg of WS rows in pat as established. Work remaining sts in St st.


Shape Neck:

Dec Row (RS): K2, SSK, work to end – 95(95-99-101-105-107) sts. Next Row: Work even.

Rep these 2 rows 3 times more – 92(92-96-98-102-104) sts. Work even until neck measures approximately 6¾”, end on WS.

Inc Row (RS): K2, M1k, work to end – 93(93-97-99-103-105) sts. Next Row: Work even. Rep these 2 rows 3 times more, end on WS – 96(96-100-102-106-108) sts.


Joining Row (RS): With RS facing, sl 96(96-100-102-106-108) sts from scrap yarn to beg of circular needle. Join MC and k these sts, then k remaining sts of back – 192(192-200-204-212-216) sts. Working 5 sts at beg and end of rows in pat as established and remaining sts in St st, work even until piece measures 11(12-13-14-15-16)” from end of neck, end on WS. Bind off.


FINISHING Fold piece in half widthwise. Sew cast-on edge together, leaving 8(8-8½-9-9½- 10)” open below fold for armhole. Repeat on bound-off edge.

knitqwik projects slideshow