Monday, May 30, 2011

Knitted Mesh Shopper's Tote

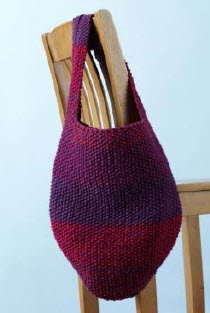
Made with a cotton/rayon yarn this tote will carry all your daily groceries!


SIZE: One Size
Finished Measurements: 161⁄ ⁄2" wide by 17" tall (excluding handles)

Sundance by Classic Elite (50% cotton, 50% microfiber; 50 gram ball = approx 83 yards)
• 7 balls 6216 Candlelight
Needles
• One pair each size US 7 and 8 (4.5 mm and 5 mm)
Or size to obtain gauge
• Two double pointed needles (dpn) size US 7 (4.5 mm) for I-Cord handles
• Stitch markers
GAUGE: 18 sts and 21 rows = 4" in Star Mesh Rib using larger needles; 21 sts and 28 rows =
4" in 1 x 1 Rib using smaller needles. Take time to save time, check your gauge.

SPECIAL TERMS:
p2tog: Purl 2 sts together (1 st decreased).
s2kp: Slip 2 sts knitwise, one at a time, to the
RH needle, k1, pass 2 slipped sts over knit st
(2 sts decreased).
ssk: (slip, slip, knit) Slip 2 sts, one at a
time, knitwise to the RH needle; return sts
to LH needle in turned position and knit
them together through the back loops (1
st decreased).
k2tog: Knit 2 sts together (1 st decreased).
m1p: (make 1 purlwise) Insert LH needle
under horizontal strand between st just
worked and next st, from the back to the
front, purl (1 st increased).

PATTERN STITCHES:
1 x 1 Rib: (multiple of 2 sts + 1)
Row 1 (RS): K1, *p1, k1; rep from * across.
Row 2: Knit the knit sts and purl the purl sts as
they face you.
Rep Row 2 for 1 x 1 Rib.

Star Mesh Rib: (multiple of 4 sts + 5)
Row 1: (RS) K1 *yo, s2kp, yo, k1; rep from * across.
Row 2: (WS) Purl.
Row 3: Ssk, yo, k1 *yo, s2kp, yo, k1; rep from *
to last 2 sts, yo, k2tog.
Row 4: Rep Row 2.
Rep Rows 1– 4 for Star Mesh Rib.

I-Cord: *Knit 1 row; without turning the work,
slide the sts to RH end of needle, pull yarn
tightly from the end of the row, (behind the
sts); rep from * until cord meas desired length.

BAG (make 2)
Using smaller needles, CO 89 sts. (WS) Begin
1 x 1 Rib; work even until piece meas 2" from
beg, end RS row. Change to larger needles;
Dec Row: (WS) P1, k1, p1 (edge sts, keep in 1
x 1 Rib throughout), place marker (pm), dec
14 sts evenly across center 83 sts as follows:
p2, p2tog, *p4, p2tog; rep from * to last 4 sts,
p1, pm, p1, k1, p1 (edge sts, keep in 1 x 1 Rib
throughout) — 75 sts rem. Est Patt: (RS) K1, p1,
k1 (edge sts, keep in 1 x 1 Rib throughout),
slip marker, work across center 69 sts in Star
Mesh Rib, slip marker, k1, p1, k1 (edge sts,
keep in 1 x 1 Rib throughout). Work even as
est until piece meas 15" from beg, end RS
row. Inc Row: (WS) P1, k1, p1 (edge sts), slip
marker, p2, m1p, *p5, m1p; rep from * across
to last 4 sts, p2, slip marker, p1, k1, p1 (edge
sts) — 89 sts. Change to smaller needles and
1 x 1 Rib: (RS) Work across, removing markers.
Work even in 1 x 1 Rib for 2", end WS row. BO
all sts in Rib.

HANDLES (make 2)
Using dpn, CO 7 sts. Work I-Cord until piece
meas 25" from beg. BO all sts.

FINISHING
Block pieces to measurements. Sew side
and bottom seams. Fasten one handle to
each side of bag as follows: Sew each end
of handles 3" in from side seam, and 2" down
from top edge on WS into bag.

Saturday, May 28, 2011

The Perfect Knitted Bucket Hat

This is the perfect knitted bucket hat!. Whether you leave it plain or embellish with a sharp button, this bucket is sure to turn heads! A beefy Cotton Yarn would make it a great sun hat!


Supplies:
16” US 7/4.5mm circular needle
1 set US 7/4.5mm dpns or size to obtain gauge
Spare circular needle, size 3mm - 4mm 24” or longer in length for provisional cast on and hem.
Yarn needle
Stitch markers
Yarn: approx 200 yards aran-weight yarn.
Shown in Malabrigo Merino Worsted, #41 Burgundy

Gauge:
18 sts and 28 rows to 4 inches
Size:
Fits most adult heads
Finished Circumference: 21 inches

Abbreviations & Techniques:
k2tog: Knit two stitches together
k1fb: Increase by knitting into the front and the back of the same stitch.
pco: Provisionally Cast On
I prefer a provisional cast on using a spare circular needle as illustrated on Eunny
Jang’s great website: http://www.eunnyjang.com/knit/2006/03/majoring_in_lace_part_iv.html
For this cast on, it helps to tension your yarn as if crocheting. With a slip knot on your right tip of your main circular needle, and the cable of a second circular needle held below, bring your right needle under the cable and pull up a loop of yarn. Swing the right needle above the cable and behind the yarn, pulling the yarn forward. Two stitches have now been cast on, including the slip knot. Continue to repeat these two steps until you have the proper number of stitches.
After completing the brim, you’ll bring the spare circular up to meet the main one and attach by
knitting together the first stitch from the main needle with the first stitch from the spare circular.
After you’ve knit together each pair of stitches, you’ll again have the number of initially cast on
stitches and can continue with the pattern.
This type of cast on is well suited for hems of all kinds. Try it out today, and if you get stuck, a
quick Google search for “Provisional Cast On” will turn up videos and other textual descriptions.
Have fun!

Instructions
Using 16” circular needle, PCO 96 sts. PM and join to begin working in rounds. Knit 2 rounds
even.
(K7, k1fb) 12 times; 108 sts.
K 7 rounds
(k8, k1fb) 12 times; 120 sts.
K 5 rounds.
P1 round to turn hem. This will be the edge of the hat’s brim.
K 5 rounds
(k8, k2tog) 12 times; 108 sts.
K 7 rounds
(k7, k2tog) 12 times; 96 sts remain.
K 2 rounds.
Join with cast on edge as follows:
Bring the spare circular needle up and behind the knitting. Knit first stitch together with first stitch on spare circular. Continue around until all stitches have been worked and your hem is complete.
Knit in rounds until hat measures 6.5 inches from brim’s edge, or as desired.
(k6, k2tog) 12 times around; 84 sts.
K 3 rounds.
(k5, k2tog) 12 times around; 72 sts.
K 3 rounds.
(k4, k2tog) 12 times around; 60 sts.
K 2 rounds.
(k3, k2tog) 12 times around; 48 sts.
K 2 rounds.
(k2, k2tog) 12 times around; 36 sts.
K 1 round
(k1, k2tog) 12 times around; 24 sts.
(k2tog) 12 times around; 12 sts.
Cut yarn and pull through remaining stitches to secure.

Finishing
Weave in any ends. Sew on button or other embellishment if desired. Enjoy!

Easy Peasy Modification
For a simpler hat, cast on the initial 96 sts as you would normally. Work brim and the rest of the hat without joining the brim in place. After you’re finished, fold under the brim and sew in place along the cast on edge.
Designed by Amy M. Swenson for Make One Yarn Studio

Saturday, May 21, 2011

Light, Lacy Vintage Cardigan

So springy and girly...what a super sweet vintage cardigan with a lacy twist!

SIZES Small (Medium, Large, XL, 2X)

KNITTED MEASUREMENTS
Bust 36 (40, 44, 48½, 52½)”/91.5 (101.5, 112, 123, 133.5) cm
Length 22 (22½, 23, 23½, 24)”/56 (57, 58.5, 59.5, 61) cm

MATERIALS
• 9 (11, 12, 13, 14) skeins Tahki Yarns COTTON CLASSIC LITE 100% mercerized cotton (1.75oz/50g; 146yds/135m) in color #4725 deep leaf green
• One pair size 5 (3.75mm) needles
OR SIZE TO OBTAIN GAUGE
• One pair size 4 (3.5mm) needles
• Stitch holder & stitch markers
• Six buttons, ¾”/19mm diameter
• Yarn needle

GAUGE
23 sts and 28 rows = 4”/10 cm in English Mesh Lace on larger needles
TAKE TIME TO CHECK GAUGE

PATTERN STITCHES
Garter stitch (Garter st)
Knit every row.
English Mesh Lace (multiple of 6 sts + 1)
Row 1 (RS) K1, * yo, ssk, k1, k2tog, yo, k1; rep from * to end.
Row 2 and all even numbered rows Purl.
Row 3 K1, * yo, k1, SK2P, k1, yo, k1; rep from * to end.
Row 5 K1, * k2tog, yo, k1, yo, ssk, k1; rep from * to end.
Row 7 K2tog, * [k1, yo] twice, k1, SK2P; rep from * to last 5 sts, [k1, yo] twice, k1, ssk.
Repeat Rows 1-8 for English Mesh Lace.

SPECIAL TERMS
K2tog: Knit 2 together (dec) – Knit 2 sts tog through the front loops.
Ssk [or ssp]: Slip, slip, knit [or purl] (dec) – Slip 2 sts, one at a time KNITWISE
[PURLWISE] to RH needle, return the sts to LH needle in the turned position and knit
[or purl] them together through the back loops.
SK2P: (Left-leaning double dec) – Slip 1, k2tog, pass slip stitch over.

NOTE: When shaping garment, be sure to keep pattern correct. Each yarn over (yo)
should have a corresponding decrease so you may have to work a single decrease
rather than a double decrease to keep stitch count correct.

BACK
With smaller needles, cast on 103 (115, 127, 139, 151) sts. (RS) Begin Garter st; work 8 rows.
(RS) Change to larger needles and English Mesh Lace; work even until piece measures
15” from beg, end with a WS row.

Shape Armholes
(RS) Bind off 6 (7, 8, 9, 10) sts at beg of next 2 rows – 91 (101, 111, 121, 131) sts rem.
Work even until Armholes measure 7 (7½, 8, 8½, 9)” from beg, end with a WS row.

Shape Shoulders
(RS) Bind off 25 (28, 31, 34, 37) sts at beg of next 2 rows – 41 (45, 49, 53, 57) sts rem.
Place sts on holder for Back Neck.

LEFT FRONT
With smaller needles, cast on 55 (61, 67, 73, 79) sts.
(RS) Begin Garter st; work 8 rows.
(RS) Change to larger needles and English Mesh Lace; work even until piece measures 15” from beg, end with a WS row.

Shape Armhole
(RS) Bind off 6 (7, 8, 9, 10) sts at beg of row – 49 (54, 59, 64, 69) sts rem.
Work even until Armhole measures 3½ (4, 4½, 5, 5½)” from beg, end with a RS row.

Shape Neck
(RS) Bind off 6 (7, 7, 8, 8) sts at beg of next 2 WS rows, then 6 (6, 7, 7, 8) sts at
beg of next 2 WS rows – 25 (28, 31, 34, 37) sts rem.
Work even until Armhole measures same as BACK to Shoulder. Bind off all sts.

RIGHT FRONT
Work as for LEFT FRONT, reversing all shaping.

SLEEVES
With smaller needles, cast on 49 (55, 55, 61, 61) sts.
(RS) Begin Garter st; work 8 rows.

Shape Sleeve
(RS) Change to larger needles and English Mesh Lace; inc 1 st each side
every 8 (8, 6, 6, 6) rows 15 (15, 18, 18, 21) times, working inc sts into pattern – 79 (85, 91, 97, 103) sts.
Work even until piece measures 18 (18, 18½, 18½, 19)” from beg, end with a WS row.
(RS) Change to smaller needles and Garter st; work 8 rows.
Bind off all sts loosely.

FINISHING
Block pieces to measurements. Sew Shoulder seams.
Neckband
With RS facing and smaller needles, pick up and knit 109 (117, 125, 133, 141) sts evenly around Neck including sts from holder.

(WS) Begin Garter st; work 7 rows.
(RS) Bind off all sts purlwise.

Button Band
With RS facing and smaller needles, starting
at Neck, pick up and knit 108 (111, 114, 117, 120) sts evenly along LEFT FRONT.
(WS) Begin Garter st; work 7 rows.
(RS) Bind off all sts purlwise.
Place markers for 6 buttons, first ½” from bottom, last ½” from Neck and rem 4 evenly spaced

Buttonhole Band
With RS facing and smaller needles, starting at bottom edge, pick up and knit 108 (111, 114, 117, 120) sts evenly along

RIGHT FRONT.
(WS) Begin Garter st; work 3 rows.
Buttonhole Row (RS) * Knit to marker, yo, k2tog; rep from * 5 more times, knit to end.
Work 3 more rows in Garter st. (RS) Bind off all sts purlwise.
Sew SLEEVES into Armholes; sew side and Sleeve seams.
Sew on buttons opposite buttonholes.
Weave in ends.

POCKETS (make 2)
With larger needles, cast on 14 sts.
Row 1 (RS) Sl1, k13.
Row 2 Slip1, k13.
Rows 3-4 Rep Rows 1-2.
Row 5 Slip1, k2, [k1-f/b] twice, k4, [k1-f/b]
twice, k3 – 18 sts.
Row 6 Slip1, k2, purl to last 3 sts, k3.
Row 7 Slip1, knit to end.
Row 8 Rep Row 6.
Rep Rows 5-8 until there are 38 sts,
ending with Row 6.
Next Row (RS) K3, * k2tog; rep from * to last 3 sts, k3 – 22 sts rem.
(WS) Change to Garter st; work 5 rows.
(RS) Loosely bind off all sts purlwise.
Weave in ends.
Sew POCKETS to FRONTS as shown in photo.

Thursday, May 19, 2011

Cowl...Capelet???...You decide!

Cowl or Capelet? Anything you call it, it's a cabled delight!


Approximately 42” around at lower edge (unstretched) x 23” around at upper edge x 19” long

MATERIALS
3 Hanks BERROCO VINTAGE DK (100 grs), #2194 Breezeway
29” and 16” Length circular knitting needles, size 5 (3.75 mm) OR SIZE TO OBTAIN GAUGE
Cable needle (cn)
1 St marker

GAUGE
22 sts = 4”; 28 rows = 4” in St st on size 6 (4.00 mm) needles
TO SAVE TIME, TAKE TIME TO CHECK GAUGE
Note: Capelet is worked on one size smaller needles than those used for gauge swatch

CAPELET
With longer circular needle, cast on 273 sts. Join, being careful not to twist sts. Mark for beg of rnd and carry marker up. Follow chart until 80 rnds have been completed (there will be 7 repeats of chart around) – 168
sts. Work even in ribbing as established for 9”. Bind off loosely in ribbing.

Wednesday, May 18, 2011

Summer Halter

A perfect top for that new boho skirt!


SIZE: Small, Medium, Large, 1X, 2X
Finished Bust 33 (37, 41, 45, 49) in. (84 (94, 104, 114.5, 124.5) cm)
Finished Length 23 (24, 25, 26, 27) in. (58.5 (61, 63.5, 66, 68.5) cm)
Note: Pattern is written for smallest size with changes for larger sizes in parentheses. When only one number is given, it applies to all
sizes. To follow pattern more easily, circle all numbers pertaining to your size before beginning.


MATERIALS
• 487-135 Lion Brand LB Collection Cotton Bamboo: Persimmon
3 3, 3, 4, 4 Balls
• Knitting Needles- Size 6 [4.00 mm]
• Stitch Holders
• Large-Eye Blunt Needles (Set of 6)


GAUGE:
22 sts + 30 rows = 4 in. (10 cm) in St st (k on RS, p on WS). BE SURE TO CHECK YOUR
GAUGE. When you match the gauge in a pattern, your project will be the size specified in the
pattern and the materials specified in the pattern will be sufficient. If it takes you less stitches
and rows to make a 4 in. [10 cm] square, try using a smaller size hook or needles; if more
stitches and rows, try a larger size hook or needles.


STITCH EXPLANATION:
NOTES:
1. Tank is made in two pieces, Back and Front.
2. Straps are worked as part of the Back. After sides are seamed, the straps are joined to the
Front with a 3-Needle bind off. Straps are worked without an edging, so edges will roll softly.
M1 (make 1) An increase worked by lifting horizontal thread lying between needles and placing it onto left needle.
Knit this new stitch through the back loop - 1 st increased.
ssk (slip, slip, knit) Slip next 2 sts as if to knit, one at a time, to right needle; insert left needle into fronts of these 2
sts and knit them tog - 1 st decreased.
s2k2p2 (slip 2-k2tog-pass 2 slipped sts over)
A triple decrease worked as follows:
1. Insert right needle as if to knit, and slip the next st from the left needle to the right needle.
2. Rep step 1, to slip next st to the right needle.
3. Knit the next 2 sts together.
4. With tip of left needle, lift the 2 slipped sts (the 2nd and 3rd st on right needle) up and over the k2tog (first st on
right needle) and off the needle - you have decreased 3 sts.


BACK
Cast on 180 (204, 224, 248, 268) sts.
Next Row (RS): *K2, pass first st worked over 2nd st and off
needle (1 st decreased); rep from * to end of row - 90 (102, 112,
124, 134) sts at the end of this row.

Work even in St st (k on RS, p on WS) until piece measures 1 in.
(2.5 cm) from beg,end with a RS row.
Note: End with a RS row means that the last row you work should be
a RS row, you will be ready to work a WS row.
Next Row (WS): Knit. Note: By knitting on the WS, a ridge is
created on the RS of the piece. This ridge is a designed to be a
decorative detail.
Shape Waist
Next (Decrease) Row (RS): K2, ssk, k to last 4 sts, k2tog, k2 - 88
(100, 110, 122, 132) sts at the end of this row.
Work even (without increasing or decreasing) in St st for 9 rows.
Rep Decrease Row - 86 (98, 108, 120, 130) sts at the end of this
row.
Rep last 10 rows 4 (5, 4, 5, 5) more times - 78 (88, 100, 110, 120)
sts rem.
Work even in St st until piece measures 11 (11 1/2, 11 1/2, 12, 12)
in. (28 (29, 29, 30.5, 30.5) cm) from beg, end with a RS row.
Next Row (WS): Knit, creating a decorative ridge on the RS.
Shape Bust
Work even in St st for 2 rows.
Next (Increase) Row (RS): K2, M1, k to last 2 sts, M1, k2 - 80
(90, 102, 112, 122) sts at the end of this row.
Work even in St st for 3 (3, 5, 5, 5) rows.
Rep Increase Row - 82 (92, 104, 114, 124) sts at the end of this
row.
Rep last 4 (4, 6, 6, 6) rows 4 (5, 4, 5, 5) more times - 90 (102, 112,
124, 134) sts when all increases are completed.
Work even until piece measures 15 (16, 16 1/2, 17 1/2, 18) in. (38
(40.5, 42, 44.5, 45.5) cm) from beg, end with a WS row.
Shape Armholes
Bind off 17 (22, 26, 31, 35) sts at beg of next 2 rows - 56 (58, 60,
62, 64) sts rem.
Next Row (RS): K18 for first strap, join a 2nd ball of yarn and bind
off next 20 (22, 24, 26, 28) sts, k to end of row for other strap - 18
sts rem for each strap.
Work both straps at once with separate balls of yarn.
Note: if you would prefer, slip the sts for one strap onto a holder.
Follow instructions below to complete one strap. Slip sts from holder
back to needle and complete the second strap in the same way as
the first.
Next Row: Purl.
Next (Shaping) Row (RS): K1, ssk, k to last st, M1, k1; on 2nd
strap, k1, M1, k to last 3 sts, k2tog, k1.
Rep last 2 rows until straps measure about 8 (8, 8 1/2, 8 1/2, 9) in.
(20.5 (20.5, 21.5, 21.5, 23) cm) from armhole bind-off. Note:
Measured straight up - at a right angle from bound-off edge - in the
same way you would measure a raglan line.
Work even in St st for 5 (5, 5 1/2, 5 1/2, 6) in. (12.5 (12.5, 14, 14,
15) cm), end with a WS row.
Next (Decrease) Row (RS): K1, (k2tog) 8 times, k1; on 2nd strap,
k1, (k2tog) 8 times, k1 - 10 sts rem for each strap.
Place sts on holders.
FRONT
Work Front same as Back to bust shaping - 78 (88, 100, 110, 120)
sts before bust shaping. Note: The last row worked should be a knit
row across the WS, creating a decorative ridge on the RS.
Shape Bust
Work 2 rows even in St st.
Next (Increase) Row (RS): K21 (24, 30, 33, 37), (k1, M1) 6 (7, 6,
7, 7) times, k24 (26, 28, 30, 32), (k1, M1) 6 (7, 6, 7, 7) times, k to
end of row - 90 (102, 112, 124, 134) sts at the end of this row.
Work even in St st until piece measures 13 (14, 14 1/2, 15 1/2, 16)
in. (33 (35.5, 37, 39.5, 40.5) cm) from beg, end with a WS row.
Shape Neck
Next (Dividing) Row (RS): K45 (51, 56, 62, 67) sts, join a 2nd
ball of yarn and k to end of row.
Work both sides at once with separate balls of yarn.
Work even in St st for 1 row.
Next (Decrease) Row (RS): K to last 3 sts, k2tog, k1; on 2nd side,
k1, ssk, k to end of row - 44 (50, 55, 61, 66) sts each side.
Next Row: Purl.
Rep last 2 rows 5 more times, end with a WS row - 39 (45, 50, 56,
61) sts rem each side.
Shape Armholes
Next Row (RS): Bind off 5 (6, 7, 8, 9) sts, k to last 3 sts, k2tog,
k1; on 2nd side, k1, ssk, k to end of row.
Next Row (WS): Bind off 5 (6, 7, 8, 9) sts, p to end of first side; on
2nd side, p to end of row - 33 (38, 42, 47, 51) sts rem each side.
Next Row (RS): K2, ssk, k to last 3 sts, k2tog, k1; on 2nd side, k1,
ssk, k to last 4 sts, k2tog, k2 - 31 (36, 40, 45, 49) sts each side.
Next Row: P to end of first side; on 2nd side, p to end of row.
Rep last 2 rows 4 (6, 6, 8, 8) more times - 23 (24, 28, 29, 33) sts
each side.
Next Row (RS): K to last 3 sts, k2tog, k1; on 2nd side, k1, ssk, k to
end of row - 22 (23, 27, 28, 32) sts each side.
Next Row: P to end of first side; on 2nd side, p to end of row.
Rep last 2 rows 1 (1, 1, 0, 1) more time(s) - 21 (22, 26, 28, 31) sts
rem each side.
Work even in St st until piece measures 18 (19, 19 1/2, 20 1/2, 21)
in. (45.5 (48.5, 49.5, 52, 53.5) cm) from beg, end with a WS row.
Size S ONLY
Next (Decrease) Row (RS): K1, k3tog, (k2tog) 3 times, k3tog,
(k2tog) twice, k3tog, k1; on 2nd side, k1, k3tog, (k2tog) twice,
k3tog, (k2tog) 3 times, k3tog, k1 - 10 sts rem each side.
Size M ONLY
Next (Decrease) Row (RS): K1, (k3tog, k2tog) 4 times, k1; on
2nd side, k1, (k2tog, k3tog) 4 times, k1 - 10 sts rem each side.
Size L ONLY
Next (Decrease) Row (RS): K1, (k3tog) 8 times, k1; on 2nd side,
k1, (k3tog) 8 times, k1 - 10 sts rem each side.
Size 1X ONLY
Next (Decrease) Row (RS): K1, (k3tog) 3 times, (k2tog) twice,
s2k2p2, k2tog, (k3tog) 3 times, k1; on 2nd side, K1, (k3tog) 3
times, (k2tog) twice, s2k2p2, k2tog, (k3tog) 3 times, k1 - 10 sts rem
each side.
Size 2X ONLY
Next (Decrease) Row (RS): K1, k3tog, (s2k2p2) twice, k3tog,
(s2k2p2) 3 times, k3tog, k1; on 2nd side, k1, k3tog, (s2k2p2) 3
times, k3tog, (s2k2p2) twice, k3tog, k1 - 10 sts rem each side.
ALL SIZES
Work even in St st for 1 row. Place sts on holders.
FINISHING
Sew side seams.
Join end of left shoulder strap to Right Front and end of right shoulder strap to Left Front (straps cross at back of Tank) with 3-Needle
bind off, as follows:
3-Needle Bind Off With RS together, hold in one hand 2 needles with equal number of sts on each. With 3rd needle, k tog 1 st from each needle, *k tog 1 st from each needle, pass first st worked over 2nd to bind off, repeat from * across.> Cut working yarn and pull
through last st to secure.
Weave in ends.

Sunday, May 15, 2011

Cotton Shawl, So Nice on Cool Summer Nights!

Just right for those cool summer nights and those very hot summer dresses!


SIZE: One Size
About 31 in. (78.5 cm) long at widest point
MATERIALS
• 480-204 Lion Brand Nature's Choice Organic Cotton Yarn: Limeade 5 Balls
• Large-Eye Blunt Needles (Set of 6)
• Additional Materials
Circular knitting needle size 8 (5 mm), 36 in. (91.5 cm) long


GAUGE:
15 sts = about 4 in. (10 cm) in Stockinette st (k on RS, p on WS). BE SURE TO CHECK YOUR GAUGE.
When you match the gauge in a pattern, your project will be the size specified in the pattern and the materials specified in the pattern will be sufficient. If it takes you less stitches and rows to make a 4 in. [10 cm] square, try using a smaller size hook or needles; if more stitches and rows, try a larger size hook or needles.


STITCH EXPLANATION:
kfb (knit into front and then back)
An increase worked as follows:
1. Knit the next st through the front loop, but do not remove the st from your left hand needle.
2. Knit the same st once more, this time inserting your needle through the back loop of the st. You will have created 2 loops (sts) on your right hand needle.
3. Drop the st from your left hand needle - you have increased 1 st.
skp (slip-knit-pass slipped st over)


A decrease worked as follows:
1. Slip the next st as if to knit, from the left needle to the right needle.
2. Knit the next st.
3. With tip of left needle, lift the slipped st (the 2nd st on right needle) up and over the first st on right needle and off the needle - you have decreased 1 st.


NOTES:
1. Shawl is worked from side to side, from one point across to the other point.
2. Circular needle is used to accommodate large number of sts. Work back and forth on circular needle, as if working on straight needles.


SHAWL
Cast on 2 sts.
Row 1: (Kfb) twice - 4 sts at the end of this row.
Row 2: K2tog, yo, k1, yo, k1 - 5 sts at the end of this row.
Row 3 (WS): Purl.
Row 4: K2tog, yo, k to last st, yo, k1 - 6 sts at the end of this row.
Rep last 2 rows until there are a total of 116 sts, end with a WS row. Note: End with a WS row means that the last row you work should be a WS row, and the next row that you are ready to work will be a RS row.
Next Row (RS): K2tog, yo, k to last 4 sts, skp, yo, k2tog - 115 sts at the end of this row.
Next Row: Purl.
Rep last 2 rows until 5 sts remain, end with a WS row.
Next Row: K2tog, k1, k2tog.
Bind off rem 3 sts.


FINISHING
Weave in ends.

Design Your Own Dishcloth Patterns!

Here's a cool tool to help you design your own pattern in your dishcloths. Make your initials, design an animal...what ever your heart desires!


Finished Measurements
11” square
Yarn
Knit Picks Dishie (100% Cotton; 190 yards/100g): any color, 1 ball.
Needles
US 8 (4.5 mm) straights or circulars, or size to obtain gauge
Notions
Yarn Needle
Gauge 18 sts and 24 rows = 4” in St st
DIY Dishcloth.


Saturday, May 14, 2011

Tote Around Town

Take this cotton tote everywhere!


SIZE: One Size
15 x 15 1/2 in. (38 x 39.5 cm) not including strap.


MATERIALS
• 860-145 Lion Brand Vanna's Choice® Yarn: Eggplant 2 Balls (A)
• 860-141 Lion Brand Vanna's Choice® Yarn: Wild Berry 2 Balls (B)
• 830-113 Lion Brand New Cotton-Ease®: Cherry 2 Balls (C)
• 830-145 Lion Brand New Cotton-Ease®: Plum 2 Balls (D)
• Knitting Needles- Size 9 [5.5 mm]
• Stitch Holders
• Large-Eye Blunt Needles


GAUGE:
14 sts = 4 in. (10 cm) in Seed st with 1 strand each of A and C held together. BE SURE TO
CHECK YOUR GAUGE. When you match the gauge in a pattern, your project will be the size
specified in the pattern and the materials specified in the pattern will be sufficient. If it
takes you less stitches and rows to make a 4 in. [10 cm] square, try using a smaller size
hook or needles; if more stitches and rows, try a larger size hook or needles.

STITCH EXPLANATION:
Seed Stitch (over an odd number of sts)
Row 1: K1, *p1, k1; rep from * across.
Row 2: K the purl sts and p the knit sts.
Rep Row 2 for Seed st.

STRIPE SEQUENCE
Stripe I Work in Seed st with 1 strand each of A and C held tog.
Stripe II Work in Seed st with 1 strand each of B and C held tog.
Stripe III Work in Seed st with 1 strand each of A and D held tog.
Stripe IV Work in Seed st with 1 strand each of B and D held tog.

TOTE
FRONT
With 1 strand each of A and C held tog, cast on 15 sts.
Row 1: Work Row 1 of Seed st across.
Row 2: Work Row 2 of Seed st to last st, k into front and back of st (inc made) – 16 sts.
Rep Row 2 until piece measures 3 1/2 in. (9 cm) from beg.
Change to 1 strand each of B and C held tog and rep Row 2 until you have 51 sts, then work even in Seed st until piece measures 7 in. (18 cm) from beg.
Change to 1 strand each of A and D, and work in Stripe III until piece measures 10 1/2 in. (27 cm) from beg.
Change to 1 strand each of B and D, and work in Stripe IV until piece measures 14 in. (35.5 cm) from beg.
Change to 1 strand each of A and C, and work in Stripe I until piece measures 15 1/2 in. (39.5 cm) from beg.

Shape Strap
Next Row: Continuing in Stripe I, work 8 sts and place onto holder, bind off next 35 sts, finish row.
Work in Seed st as established on remaining 8 sts until Strap measures 2 in. (5 cm), then change to 1 strand each of
B and C.
Work in Stripe Sequence as follows:
Work in Stripe II until Strap measures 6 1/2 in. (16.5 cm), work in Stripe III until Strap measures 10 in. (25.5 cm), then continue in Stripe IV until Strap measures 12 in. (30.5 cm), AT THE SAME TIME, dec 1 st at outer edge of Strap every 3 in. (7.5 cm), 3 times – 5 sts.
When Strap measures 12 in. (30.5 cm), bind off.
For second half of Strap, place sts from holder back onto needle, rejoin A and C, and work as for first half of Strap.

BACK
Work as for Front.

FINISHING
Sew Front and Back together along lower edge. Sew sides, continuing side seam along edge of Straps (seam will run along center of finished Straps). Sew ends of Straps together. Weave in ends.

Wednesday, May 11, 2011

The Sweetest Klenex Box Ever!

You are going to love to knit this home accessory up! The yarn is so much fun!


Materials & Equipment
yarn- 1 skein, T-Shirt by Be Sweet
needles- 15 US: 10mm – set of 5 dpn
equipment- tapestry needle

directions
Using 15 US: 10 mm, holding 2 dpn together, CO 36 sts – then remove one
needle and divide sts evenly between 4 needles – 9 sts per needle.

Join work and begin to work ITR:
Next 20 rows: k
R21: *k2tog, k5, k2tog-tbl – rep from * 3 times more.
R22: k
R23: *k2tog, k3, k2tog-tbl – rep from * 3 times more.
R24: k
R25: BO
finishing
Use tapestry needle and weave in ends.

Tuesday, May 3, 2011

Meandering Scarf

This scarf goes To and Fro. A great pattern for cotton yarns!

Materials Lorna's laces Shepherd Worsted in color Gold Hill, 1 skein (225 yds) 20 pony beads (optional) US 10 1/2 needles


Gauge 14 st., 6 rows = 4". Exact gauge is not essential.

Gauge
Finished size after blocking: 6" x 50"
Abbreviations k - knit p - purl SSB - Seed St Border K1, P1, K1 st. - stitch

Directions
Knit on cast on Use a slip knot for first st,* knit 1 st, put that st on left needle, reversing it (3 st on needle). Repeat from * to desired number of st. When casting on at end of a row, just use the last st (instead of a slip knot) as your starting point.


Lace pattern Row 1:
*YO, SSK, K3. Repeat from *

Row 2 and all wrong side rows: Purl

Row 3: * K1, YO, SSK, K2. Rep from *

Row 5: * K2, YO, SSK, K1. Rep from *

Row 7: *K3, YO, SSK. Rep from *

Row 9: *K3, K2 tog, YO,. Rep from *

Row 11: *K2, K2 tog, YO, K1. Rep from *

Row 13: * K1, K2 tog YO, K2. Rep from *

Row 15: *K2 tog, YO, K3. Rep from *


Pattern:
Knit YO SSK K2tog All even rows (wrong side) are purled. Using knit on cast on, C.O. 11 st loosely.

Row 1: *P1, K1. Rep from *, end P1

Row 2 -4: Repeat Row 1

Row 5: (RS) On left needle, C.O. 5 st, (K1, P1) 4 times. Work one repeat of pattern, end P1, K1, P1.

Row 6: On left needle, C.O. 5 st, (K1, P1) 4 times, P5, (P1, K1) 4 times

Row 7: (K1, P1) 4 times, Work one repeat of pattern Row 3, (P1, K1) 4 times.
Row 8: (K1, P1) 4 times, purl 5, (P1, K1) 4 times.

Row 9: Seed St Border (SSB), Row 5 of pattern, 3 repeats, SSB

Row 10: SSB, P 15, SSB Continue thus, working SSB, 3 repeats of pattern, SSB on right side, repeat Row 10 on wrong side.


When scarf measures approximately 48", end with Row 4 of pattern.


End Shaping: Row 1: (K1,P1) 4 times, continue working pattern on center 5 st, (P1,K1) 4 times. Row 2 - 4: ( K1, P1) 4 times, P5, (P1, K1) 4 times


Row 5: Bind off 5 st, K1, P1, work pattern on center 5 st, (P1, K1) 4 times


Row 6: Bind off 5 st, K1, P1, purl 5 pattern st, P1, K1, P1 Row 7 - 10: *P1, K1. Repeat from *, end P1


Bind off loosely.
As with any lace knitting, it isn't finished until it has been blocked. On a padded but firm surface, pin the scarf out to a gently stretched size. Steam with a steamer or hold your steam iron just barely above the surface to cover the whole area. Allow to dry thoroughly, discouraging any resident pets from napping on your creation.
Optional but recommended: For fringe, cut 20 lengths of yarn 11" long. Fold each pc in half and using a crochet hook, pull the fold through the first st of the center portion of the hem. Pull both cut ends of the yarn through the loop and snug up to the hem (lark's head knot).
Tie an overhand knot using both cut ends, about 1-1/2" below the hem. Put a pony bead on one strand (I used a tiny crochet hook to pull the yarn through). Now tie another overhand knot using both ends about 1" below the first, trapping the bead. Repeat across the center portion of the hem, 10 ends evenly spaced on each end.

knitqwik projects slideshow