Showing posts with label accesories. Show all posts

Friday, April 13, 2012

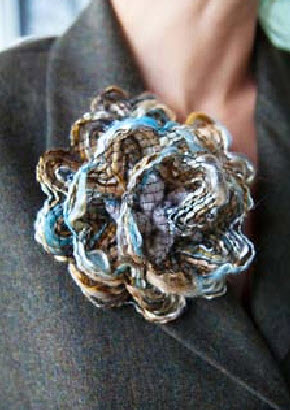
A Corsage For That New Spring Jacket

Knit up a corsage for every oufit and make some for your friends! Spring is Here! This Berreco pattern is quick and easy!

FINISHED MEASUREMENTS

Approximately 5½" across (at widest point)

MATERIALS
1 Hank BERROCO RIC RAC, #1117 Alder Bark
Straight knitting needles, size 2 (2.75 mm)
Banana hair clip or pin
Sewing needle and matching thread

NOTE

When picking up loops along straight edge of Ric Rac, only pick up the loops at the points of multi-colored
zigzags, not the ones on the solid colored triangles between the zigzags.

FLOWER
Knot one end of Ric Rac.  Insert point of RH needle from front to back through first loop on top edge (straight
edge); insert point of RH needle through next loop on top edge, then with the other needle, lift first loop on RH needle over the second loop as if to bind off (this gathers Ric Rac). Continue in this manner until you have worked across a total of 31 zigzags, binding off the last st.  Knot the end, then cut off.

FINISHING
Coil the ruffle you have made into a flower shape with both knots on the underside.  Untie the knots carefully and knot them together.  With sewing needle and thread, sew through center of the flower, joining all layers together, then sew to banana clip or a pin.


Friday, March 2, 2012

So Sari...Ribbon Bracelet

So sorry, time got away from me last month...for those that have moved and have tried to unpack and organize a house in a month hopefully can relate. With apologies, I present a very cool knitted braclet from Tilli Tomas.

One size fits most; cuff - 6.5” circ., bangle - 7” circ.


Materials
1 skein Tilli Tomas Sari Ribbon (60 yds/100 g; 90 % silk, 10% cotton)
*Note: 1 skein will make two bracelets
#7 US ( mm) needles
Tapestry needle
 
CO 12 and work in St. st. until strip measures approx. 7", or a half-inch larger than the circumfrence of your wrist. Join active stitches to CO edge by picking up 12 st. along CO edge, and BO using 3-needle
bind off. (Alternatively, BO, then seam to CO edge using mattress stitch.) Curl top and bottom (only two remaining long edges) of tube inward to meet. Seam all around using mattress stitch, then flip
bracelet so seam faces inside of wrist.

Cuff:
CO 11 and work all rows (RS and WS) as follows:
{*K1, P1* until 1 before end, K1.}
Work in this pattern (seed stitch) until strip measures approx. 6.5” long, or the circumference of your
wrist. BO.
Using a tapestry needele and extra Sari yarn, lace open edge of cuff together like sneakers, starting in
the middle and working to each edge, so that you have two laces with two bows. Tie to close.

Saturday, November 26, 2011

I'm Not Only Knitting ...Part 3, Thanks to Maddyloo.com


My vintage charms are taking me to different venues. I recently discovered a great new company that makes the best hair ties and headbands.
Well, as I was reading Lucky magazine (I received a free subscription); I was perusing the last issue when they had an article about these hair ties from http://www.maddyloo.com/, and as I was reading, I thought WOW...wouldn't my charms look cool on these. After I received my first order I contacted the owner, Honeya and she is great! Check out her website, and order a bunch.
So, when I received my order and here's what happened: (Now if you want the hair ties with the charms, contact me for information.)
My take on a great thing!

Matching the color of the vintage charm
 to the color of the hair tie!


OK, Bob Dylan isn't vintage, but he is an icon
 and I consider his Album cover totally vintage!

Making these hair ties sweet and fun!


Thursday, November 24, 2011

I'm Not Only Knitting...Part 2

Not only have I been getting ready for Thanksgiving, and been busy making paper beads, but I have been making vintage charm jewelry. Let me know what you think...
Necklaces with square and round charms.
40 inch and 32 inch necklaces.

Closer look

Vintage charm Bracelets

Vintage Travel Charms
To All... Have a Happy Thanksgiving!

Wednesday, March 23, 2011

Knit Project Bag

Knit yourself a pyramid shaped project bag to make your knitting projects mobile. Finished Size About 61/2" wide at base and 6" tall, after felting.

Yarn Malabrigo Rasta (100% merino; 90 yd [82 m]/150 g): #863 zarzamora
(purple) and #868 coronilla (gold), 1 skein each.
Needles Size 13 (9 mm) (see Notes).
Adjust needle size if necessary to obtain the correct gauge.
Notions: Markers (m); removable markers; waste yarn for provisional CO;
tapestry needle.
Gauge 11 sts and 11 rnds = 4" in St st, before felting; 12 sts and 12 rnds = 4" in St st, after felting.
Notes • This bag can be worked with doublepointed needles, two circulars, or the magic-loop method. • Because of the provisional cast-on, you may need to adjust the tension of the cast-on stitches as you work across
them. If necessary, move the extra looseness across the row to one place,
pull the extra yarn to the wrong side and leave a loop. During finishing, cut the loop and weave in the ends; felting will secure them.

•You can arrange the colors in any way you like. You could make each triangle a solid color or alternate colors every round or two on each triangle. Two skeins of yarn are enough for two bags, so you can experiment.

Stitch Guide
Triangle:
Rnd 1: K20, sl 1, k2tog, psso, k19, sl 1, k2tog, psso, k19, sl 1, k2tog (last st of rnd and first st of next rnd), psso—60 sts rem.
Place removable m in each dec.
Rnd 2: *Knit to 1 st before marked st, sl 1, k2tog, psso; rep from * 2 more times (last k2tog uses last st of rnd and first st of next rnd)—6 sts dec’d.
Rep Rnd 2 every rnd 8 more times—6 sts rem.
Rnd 11: Ssk 3 times—3 sts rem.
Rnd 12: Ssk, sl st to left needle, use right needle to pass 2nd on left needle over first—1 st rem.
Cut yarn, leaving a 6" tail. Fasten off last st.

Bottom
With gold and the invisible provisional method (see Glossary), CO 22 sts. *With a separate strand of waste yarn and cont with same strand of gold, CO 22 sts; rep from * once more—66 sts total. Place marker (pm) and join in the rnd. Work triangle (see Stitch Guide), changing to purple on Rnd 9—no sts rem.

Back
With purple, RS facing, and beg at one corner of bottom, pick up and knit 1 st in corner, remove provisional CO from 22 sts along one edge and knit these sts, pick up and knit 1 st in corner—24 sts total.
Sl last 2 sts to left needle, pass 2nd st over first, sl rem st to right needle—23 sts rem.
Slide sts to other end of needle. Sl 2 sts to right needle, pass 2nd st over first, sl rem st to left needle—22 sts rem. Slide sts to other end of needle. Using the provisional method and same strand of purple, CO 22
sts—44 sts total. With a separate strand of waste yarn and same strand of purple, CO 22 sts—66 sts total. Pm and join in the rnd. Work triangle, changing to gold on Rnd 7—no sts rem.

Left Side
With purple, RS facing, and beg at corner of bottom that is not attached to back, pick up and knit 1 st in corner, remove provisional CO from 22 sts along bottom edge and knit these sts, pick up and knit 1 st in corner—24 sts total. Sl last 2 sts to left needle, pass 2nd st over first, sl rem st to right needle—23 sts rem. Slide sts to other end of needle. Sl 2 sts to right needle, pass 2nd st over first, sl rem st to left needle—22 sts rem. Slide sts to other end of needle. Remove provisional CO from 22 sts along edge of back and knit these sts—44 sts total. Using the provisional method and same strand of purple, CO 5 sts—49 sts total. Using the backward-loop method, firmly CO 12 sts—61 sts total. With a separate
strand of waste yarn and same strand of purple, CO 5 sts—66 sts total. Pm and join in the rnd. Work triangle, changing to gold on Rnd 7—no sts rem.

Right Side
With purple, RS facing, and working along rem edge of bottom, pick up and knit 1 st in corner, remove provisional CO from 22 sts along bottom edge and knit these sts, pick up and knit 1 st in corner—24 sts total. Sl last 2 sts to left needle, pass 2nd st over first, sl rem st to right needle—23 sts rem. Slide sts to other end of needle. Sl 2 sts to right needle, pass 2nd st over first, sl rem st to left needle—22 sts rem. Slide sts to other end of needle. Remove provisional CO from 5 sts along edge of left side and knit these sts—27 sts total. Using the backward-loop method, firmly CO 12 sts—39 sts total. Remove provisional CO from 5 sts along edge of left side and knit these sts—44 sts total. Remove provisional CO from 22 sts along edge of back and knit these sts—66 sts total.
Pm and join in the rnd. Work triangle, changing to gold on Rnd 7—no sts rem.

Finishing
Pull a double thickness of purple through top of pyramid as a placeholder for handle, which will be added later. Turn bag inside out and work in ends loosely, being careful not to pull and distort bag fabric.
Felting: With bag inside out, place in washing machine with a pair of jeans for extra agitation. Wash on lowest and hottest water setting with a small amount of mild detergent. Sts will still be quite distinct after bag is felted. Allow to airdry.

Handle: Make a twisted cord as foll: Cut a 24" length of each yarn and tie tog at one end. Twist each strand clockwise until it is tightly twisted. Hold strands beside each other and allow to twist around each other. Tie ends tog. Remove placeholder yarn from top of pyramid and insert handle so that pyramid top is centered on handle. Knot handle at top of pyramid.
Tie ends of handle tog with an overhand knot about 5–6" from top of bag to form a hanging loop.

knitqwik projects slideshow